

Hello there, all you Monday blog readers. How was your weekend? Mine was great. I got to spend a good amount of it with my family, which is always a wonderful way to spend the weekend. We watched the Super Bowl last night and I had way too many chips and too much cheese dip. But before all of that, I found some time during the day to sew. I had been anxiously awaiting some new fabric the week before so I was already planning on a little free time to start something up once the weekend rolled around.
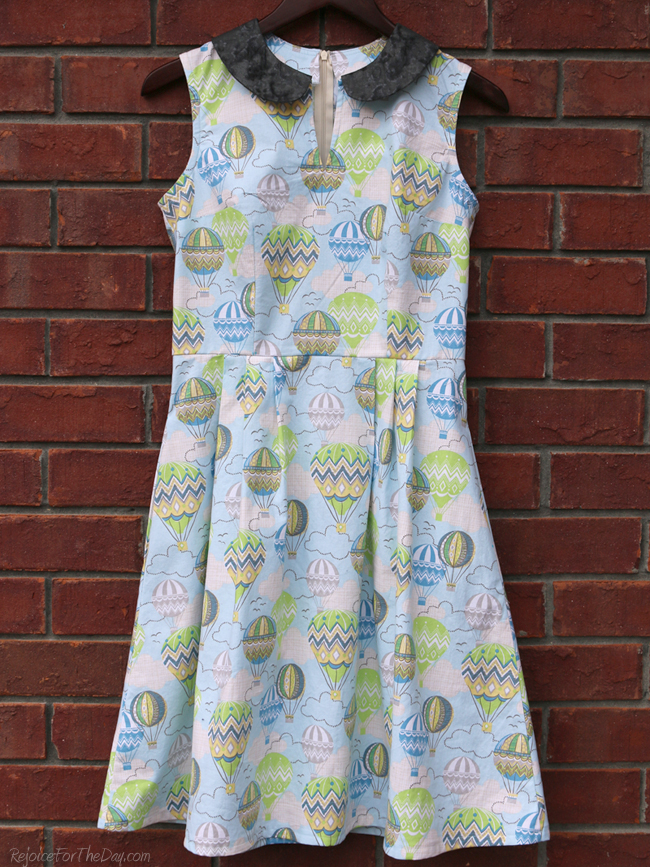
This is the Blown Away dress. Named after the fabric, and that obviously because there are balloons and clouds all over it. This dress will also probably be known as the balloon dress around here. I have been wanting a balloon dress for months. It all started when I saw this dress in a kitchy boutique-ish, antique store in Franklin, TN – last August I think it was.

Isn’t it beautiful? I wanted it right away, until I saw that it was a bit out of my price range considering we were on our way to the dentist, and were not in Nashville that particular day to buy anything other than some bulk groceries and teeth cleanings. I was pretty disappointed, but on the bright side, I thought the dress looked like a style that I would be able to make myself, if only I could find some wonderful balloon fabric. I’ve been looking and hadn’t really found any that I was completely in love with, so I settled on this that I got from fabric.com:

If only the color was a bit darker it would be a closer match, but the balloons are kind of similar, so I was still happy.
Before I got the material though, I got this new pattern specifically with a peter pan collared balloon dress in mind.
 I did some research on it because I was a little worried about that neck. Peter pan collar or not, I can’t stand the look or feel of a high neck collar on me. I do love a peter pan collar though so I was determined to make it work. I read several bloggers’ posts and notes on the dress and got to work on a practice bodice for myself. I traced out the bodice because I was making adjustments from the very beginning.
I cut a size 10 in most Simplicity patterns. I usually have some bulk in the back and most often I have to take the shoulder seams up some. What I did with this one was cut the size 10 for the sides, went to the size 8 for the shoulders and arms, then the size 6 for the neck. From holding the pattern tissue pieces up to me, I knew a strait 10 was gonna be too big at the shoulders and too high up at the neck. These before adjustments seemed like the best ones to make.

My main concern with the practice bodice was where the neck would end up. I didn’t interface it or install a zipper on the practice make. Once I knew the neck was gonna be comfortable, I got started on the real deal. One other thing I did do on the first draft was have my guy measure where the back pieces ended up touching each other, and once that was marked, I cut an inch out of the back of the pattern piece. This almost messed up the back pleat placement making them too close to the zipper, but nothing was gonna go missing with the pleats so I left them as is.

The dress ended up pretty nice, I think. I love the collar, and it is not too high at all. I didn’t put the fabric loop at the top of the neck split because I read a lot of people’s thoughts on that little fabric square being a pain to make. Many suggested using elastic. I tried this but my elastic was too thin. Since I know how to make a thread loop now I was gonna do that if need be. I don’t think I will, I kind of like the open look of it. As for the fit, It looks and feels fine. My side seams had to be let out a bit at the waist and the arms may be a little snugger than I normally like, but it is not uncomfortable in any way. The back came out so well, I am happiest about the fit here. I always end up with an awkward looking back when the zipper goes this high. I thanked my guy several times for having the patience to help me pin that excess out.

The hardest part about making the dress, and I think awkward would be a better word, was turning the facing down and getting it smooth on the inside because of thickness from the interfacing. The dress isn’t lined, yay, and I made my own facings for the arm holes instead of the suggested bias tape. I really didn’t read the directions fully except for the collar and pockets – it was that easy – the illustrations were sufficient enough. (Proof only that I am getting better at this dressmaking thing.)
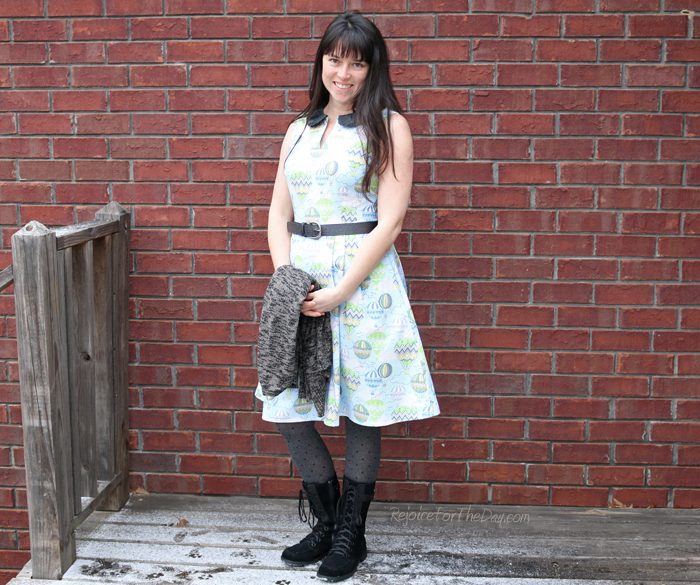
And that is all I have to say about this dress. Let me know what you think. Hopefully, this balloon material doesn’t look too ridiculous for someone my age. Which is… well, old enough to have a teenage son, but anyway. I really like it so that is all that matters. 😉 Oh, and the husband likes it as well – because that would make a difference too.
Another dress to add to the collection.
Linking up with: Craftastic Monday, Creative Mondays, Do Tell Tuesday, Tuesday’s With a Twist & Passion for Fashion & Snickerdoodle Sunday.


So pretty! Love the collar as well. Thank you for sharing at Snickerdoodle. Hope you come this Saturday as well!
LikeLike
The collar is my favorite part. Well, that and the pockets. 😉 Thanks for hosting the link up.
LikeLike
Great dress, love the fabric you picked 🙂
Thanks for sharing at Creative Mondays..
LikeLike
Why, thank you! And thanks for the feature over on your site.
LikeLike
Why, thank you! And thanks for the feature over on your site.
LikeLike
I love this! Looks great and fits great. 🙂
LikeLike
Thank you! I was very happy with how the fit ended up.
LikeLike
So cute!! What an adorable print 🙂
LikeLike
I was back and forth about getting that fabric for weeks. I am glad I did, it looks much better now that it has been made into a dress. Thanks!
LikeLike
I was back and forth about getting that fabric for weeks. I am glad I did, it looks much better now that it has been made into a dress. Thanks!
LikeLike
I love it! I was also eyeing some balloon fabric a few weeks ago. It’s looks like you’ve done a fabulous job adjusting the pattern to fit you just right. Congrats.
LikeLike
What an adorable dress and so identical to the one on the model. Wonderful! Thanks for the sweet WELCOME BACK! Yay! ♥
LikeLiked by 1 person
Thank you, Renae! I am glad to see you back in the blogging world. 😉
LikeLike
Thank you! There were a few balloon prints to choose from, but I am glad I went with this one. I would love to see what you end up making should you get some balloon fabric of your own. 😉
LikeLike